


Introduction
In the dynamic realm of e-commerce, providing customers with a seamless shopping experience is fundamental.
To achieve this goal, modern e-commerce applications often adopt a three-tier architecture, leveraging the scalability and flexibility of cloud services.
In this article, we will explore the deployment of a three-tier architecture e-commerce application on Amazon Web Services (AWS) using Amazon Elastic Kubernetes Service (EKS) and Helm.
Overview of the Project
Our project revolves around the development and deployment of a robust e-commerce application designed to handle the complexities of online retail.
Through a microservices-based architecture, each component of the application is encapsulated within containers, allowing for scalability, isolation, and easy management.
Objectives
The primary objective of our project is to demonstrate the deployment of a three-tier architecture e-commerce application on AWS EKS, emphasizing best practices and leveraging modern DevOps tools such as Helm for streamlined orchestration and management.
Importance of Three-Tier Architecture
The three-tier architecture, consisting of presentation, application, and data tiers, offers numerous benefits for e-commerce applications.
By separating concerns and distributing workload across multiple layers, this architecture promotes scalability, maintainability, and fault tolerance.
Customers benefit from improved performance and reliability, while developers enjoy flexibility and ease of deployment.
What is Amazon EKS (Elastic Kubernetes Service)?
Amazon EKS is a fully managed Kubernetes service provided by AWS.
It simplifies the process of running Kubernetes clusters in the cloud, allowing you to focus on deploying and managing containerized applications without the burden of maintaining the underlying infrastructure.
Key Features of Amazon EKS:
Managed Kubernetes Control Plane: Amazon EKS automatically handles the deployment, scaling, and maintenance of the Kubernetes control plane, including the API server, scheduler, and etcd storage.
Scalability and High Availability: With Amazon EKS, you can easily scale your Kubernetes clusters to accommodate changes in workload demand. Additionally, Amazon EKS ensures high availability by distributing control plane components across multiple Availability Zones.
Integration with AWS Services: Amazon EKS integrates seamlessly with other AWS services, allowing you to leverage services such as Amazon RDS, Amazon S3, and Amazon CloudFront to build comprehensive and scalable applications.
Security and Compliance: Amazon EKS follows AWS security best practices and provides features such as IAM integration, network policies, and encryption at rest and in transit to help you secure your Kubernetes workloads and meet compliance requirements.
By utilizing Amazon EKS, you can accelerate the deployment of containerized applications, streamline operations, and focus on delivering value to your customers without the overhead of managing infrastructures.
What is Helm?
Helm is a package manager for Kubernetes applications.
It simplifies the process of deploying, managing, and upgrading complex Kubernetes applications through the use of charts, which are pre-configured templates describing a set of Kubernetes resources.
Key Features of Helm:
Charts: Helm packages are called charts. A chart is a collection of files that describe a set of Kubernetes resources, such as deployments, services, and ingress rules.
Charts can be easily shared and reused, allowing you to leverage existing configurations and best practices.
Templates: Helm uses Go templating to generate Kubernetes manifests from chart templates. This enables parameterization and customization of Kubernetes resources based on environment-specific configurations.
Release Management: Helm tracks the state of deployed applications through releases. A release is a specific instance of a chart deployed into a Kubernetes cluster. Helm provides commands for installing, upgrading, and deleting releases, making it easy to manage the application lifecycle.
Repositories: Helm charts are hosted in repositories, which serve as centralized sources for sharing and discovering charts. Helm comes with a default public repository called Helm Hub, but you can also create and host your own private repositories.
Dependencies: Helm supports chart dependencies, allowing you to define dependencies between charts. When installing a chart, Helm automatically resolves and installs its dependencies, simplifying the management of complex application stacks.
By leveraging Helm, you can streamline the deployment and management of Kubernetes applications, reduce manual configuration errors, and increase productivity in managing your containerized workloads.
Deployment Process
For this project, we will be deploying our application, which has been coupled as microservices, to an AWS EKS cluster using Helm.
Prerequisites
Before diving into the deployment process, ensure that you have the following prerequisites in place:
AWS Account: You must have an active AWS account with AWS CLI configured and the necessary permissions to create and manage resources, including Amazon EKS clusters.
eksctl: eksctl is a simple command-line utility for creating and managing Kubernetes clusters on AWS EKS. Make sure you have eksctl installed on your local machine. You can install eksctl by following the instructions provided in the official documentation: eksctl Installation Guide.
Kubectl: kubectl is the command-line tool for interacting with Kubernetes clusters. Ensure that you have kubectl installed and configured to communicate with your AWS EKS cluster. You can install kubectl by following the instructions provided in the official Kubernetes documentation: Install and Set Up kubectl.
You should receive the following outputs after executing the subsequent commands: aws --version , eksctl version and kubectl version

With these prerequisites fulfilled, you'll be ready to embark on the journey of deploying our three-tier architecture e-commerce application on AWS EKS using Helm.
In the upcoming sections, I will guide you through each step of the deployment process, from configuring our AWS CLI to setting up the AWS EKS cluster to deploying the microservices using Helm charts.
Configuring AWS CLI
Before we proceed, we need to authenticate our terminal to communicate with the AWS API from the command line.
This allows us to create resources on our AWS account without having to log into the AWS Management Console.
To configure AWS CLI, follow these steps:
Create an IAM User: First, you need to create an IAM (Identity and Access Management) user in your AWS account. IAM users are entities with permissions to interact with AWS services. Follow this guide to create an IAM user from your root account.
Generate Access Keys: After creating the IAM user, generate access keys for the user. Access keys consist of an access key ID and a secret access key, which are used to authenticate AWS CLI requests. Follow this guide to generate access keys for the IAM user.
Run
aws configure: Once you have the access keys, proceed to the terminal and run theaws configurecommand.This command prompts you to enter four queries:
Access Key ID: Enter the access key ID generated for the IAM user.
Secret Access Key: Enter the secret access key generated for the IAM user.
Default region: Specify the default region where you want your resources to be created (e.g., us-east-1).
Output format: Choose the output format for AWS CLI commands (e.g., json, text).

I configured mine earlier, my access key and secret access key have been captured, and my default region was set to eu-central-1, and my default output format was set to json.
You can choose any region of your choice as long as that's where you want your resources created and that's the region you are in on your console.
With AWS CLI configured, you'll be able to interact with your AWS resources seamlessly from the command line.
Check Authentication
To check if AWS CLI is authenticated, run the following command:
aws iam get-user
You should receive information about the IAM user you configured, confirming that the AWS CLI is properly authenticated.

Provisioning the AWS EKS Cluster
Now that we have AWS CLI configured and eksctl installed, we can proceed to provision our AWS EKS cluster.
Ensure that you have fulfilled the prerequisite of having eksctl installed on your local machine.
To create the AWS EKS cluster, run the following command in your terminal:
eksctl create cluster --name <cluster-name> --region <region>
Replace <cluster-name> with the desired name for your EKS cluster and <region> with the AWS region where you want the cluster to be provisioned.
This command will initiate the creation of the EKS cluster, which may take approximately 15 to 20 minutes to complete.
eksctl create cluster --name my-eks-cluster --region eu-central-1
In my own case here, my cluster name is my-eks-cluster and my region is eu-central-1

Default Configuration
When using the eksctl create cluster command without specifying any configuration options, eksctl creates a cluster with default settings. The default configuration typically includes:
Node Group: A single node group with default settings is created. This node group consists of one or more EC2 instances (nodes) that run your Kubernetes workloads.
Instance Type: The default instance type for the EC2 instances is usually determined by eksctl based on best practices and recommendations.
Instance Distribution: The EC2 instances are distributed across multiple Availability Zones within the specified AWS region to enhance availability and fault tolerance.
Networking: A default VPC is created for the EKS cluster, along with subnets in each Availability Zone. The cluster's networking is configured to use the default VPC and subnets.
Kubernetes Version: The latest stable version of Kubernetes supported by Amazon EKS at the time of cluster creation is used as the default Kubernetes version.
Security: IAM roles and security groups are automatically created and associated with the cluster to provide necessary permissions and control network traffic.
Logging and Monitoring: Basic logging and monitoring configurations are enabled by default, including CloudWatch Logs for logging and CloudWatch Metrics for monitoring.
These are some of the default settings that eksctl uses when creating an EKS cluster without explicit configuration options.
Please note that the actual creation time may vary depending on the region and the resources being provisioned.
Managed Control Plane
Once the cluster creation process is complete, you will have a fully functional AWS EKS cluster ready for deploying your applications.
If you had observed, you would have noticed I didn't mention anything about the master node amongst the resources eksctl is creating for us.
When using eksctl to create an Amazon EKS cluster, it abstracts away the details of managing the Kubernetes control plane (also known as the master nodes).
Instead of explicitly creating or managing the control plane, eksctl handles this aspect for you.
Under the hood, eksctl interacts with the Amazon EKS service to provision and manage the control plane on your behalf.
This means that you don't need to worry about configuring or managing the control plane separately; eksctl takes care of it as part of the cluster creation process.
Your focus as a user is primarily on defining the configuration of the worker nodes (EC2 instances) that will run your Kubernetes workloads, such as specifying the instance type, number of nodes, networking settings, and other parameters relevant to your application requirements.
In our case, we left the configuration on default settings.
Once the cluster creation process is complete, you will have a fully functional AWS EKS cluster ready for deploying your applications.

Before we proceed with deploying applications on our AWS EKS cluster, it's essential to set up certain components to ensure smooth operation and integration with AWS services.
Let's go through each step and explain why it's necessary:
IAM OIDC Provider Configuration:
Purpose: The IAM OIDC provider enables Kubernetes service accounts to assume IAM roles securely. This integration allows Kubernetes workloads running in the cluster to access other AWS services securely using IAM roles.
Explanation: By configuring the IAM OIDC provider, we establish a trust relationship between the EKS cluster and IAM, allowing Kubernetes pods to assume IAM roles using OIDC tokens.
ALB Controller Deployment:
Purpose: The Application Load Balancer (ALB) controller enables Kubernetes workloads to be exposed externally through ALBs. It manages the lifecycle of ALB resources based on Kubernetes ingress resources.
Explanation: Deploying the ALB controller ensures that Kubernetes ingress resources can be utilized to route traffic to backend services running in the cluster. This enables external access to applications hosted on the cluster via ALBs.
Amazon EBS CSI Plugin Configuration:
Purpose: The Amazon Elastic Block Store (EBS) Container Storage Interface (CSI) plugin allows Kubernetes workloads to use EBS volumes as persistent storage.
Explanation: Configuring the Amazon EBS CSI plugin enables Kubernetes pods to dynamically provision EBS volumes and attach them to pods as persistent volumes. This facilitates data persistence and enables stateful applications to store and retrieve data reliably.
Now, let's proceed with configuring the IAM OIDC provider:
export cluster_name=my-eks-cluster
Then run this
oidc_id=$(aws eks describe-cluster --name my-eks-cluster --query "cluster.identity.oidc.issuer" --output text | cut -d '/' -f 5)
This command retrieves the OIDC issuer URL for the EKS cluster and extracts the unique identifier.
Check if there is an IAM OIDC provider configured already
aws iam list-open-id-connect-providers | grep $oidc_id | cut -d "/" -f4
If not, run the below command to associate IAM OIDC provider with the cluster
eksctl utils associate-iam-oidc-provider --cluster my-eks-cluster --approve
you should get this

These commands verify if an IAM OIDC provider is already associated with the cluster.
If not, it associates the IAM OIDC provider with the cluster, enabling Kubernetes service accounts to assume IAM roles securely.
Once the IAM OIDC provider is configured, we can check again with the command we used earlier
oidc_id=$(aws eks describe-cluster --name my-eks-cluster --query "cluster.identity.oidc.issuer" --output text | cut -d '/' -f 5)
As you can see, there is an output this time around, This command will output the ARN of the IAM OIDC provider associated with your EKS cluster

Now that we have that sorted, we can now proceed to deploying the ALB controller and configuring the Amazon EBS CSI plugin:
Here's a step-by-step guide to deploying the ALB controller
1. Download IAM policy:
curl -O https://raw.githubusercontent.com/kubernetes-sigs/aws-load-balancer-controller/v2.5.4/docs/install/iam_policy.json
2. Create IAM Policy:
aws iam create-policy \
    --policy-name AWSLoadBalancerControllerIAMPolicy \
    --policy-document file://iam_policy.json
3. Create IAM Role:
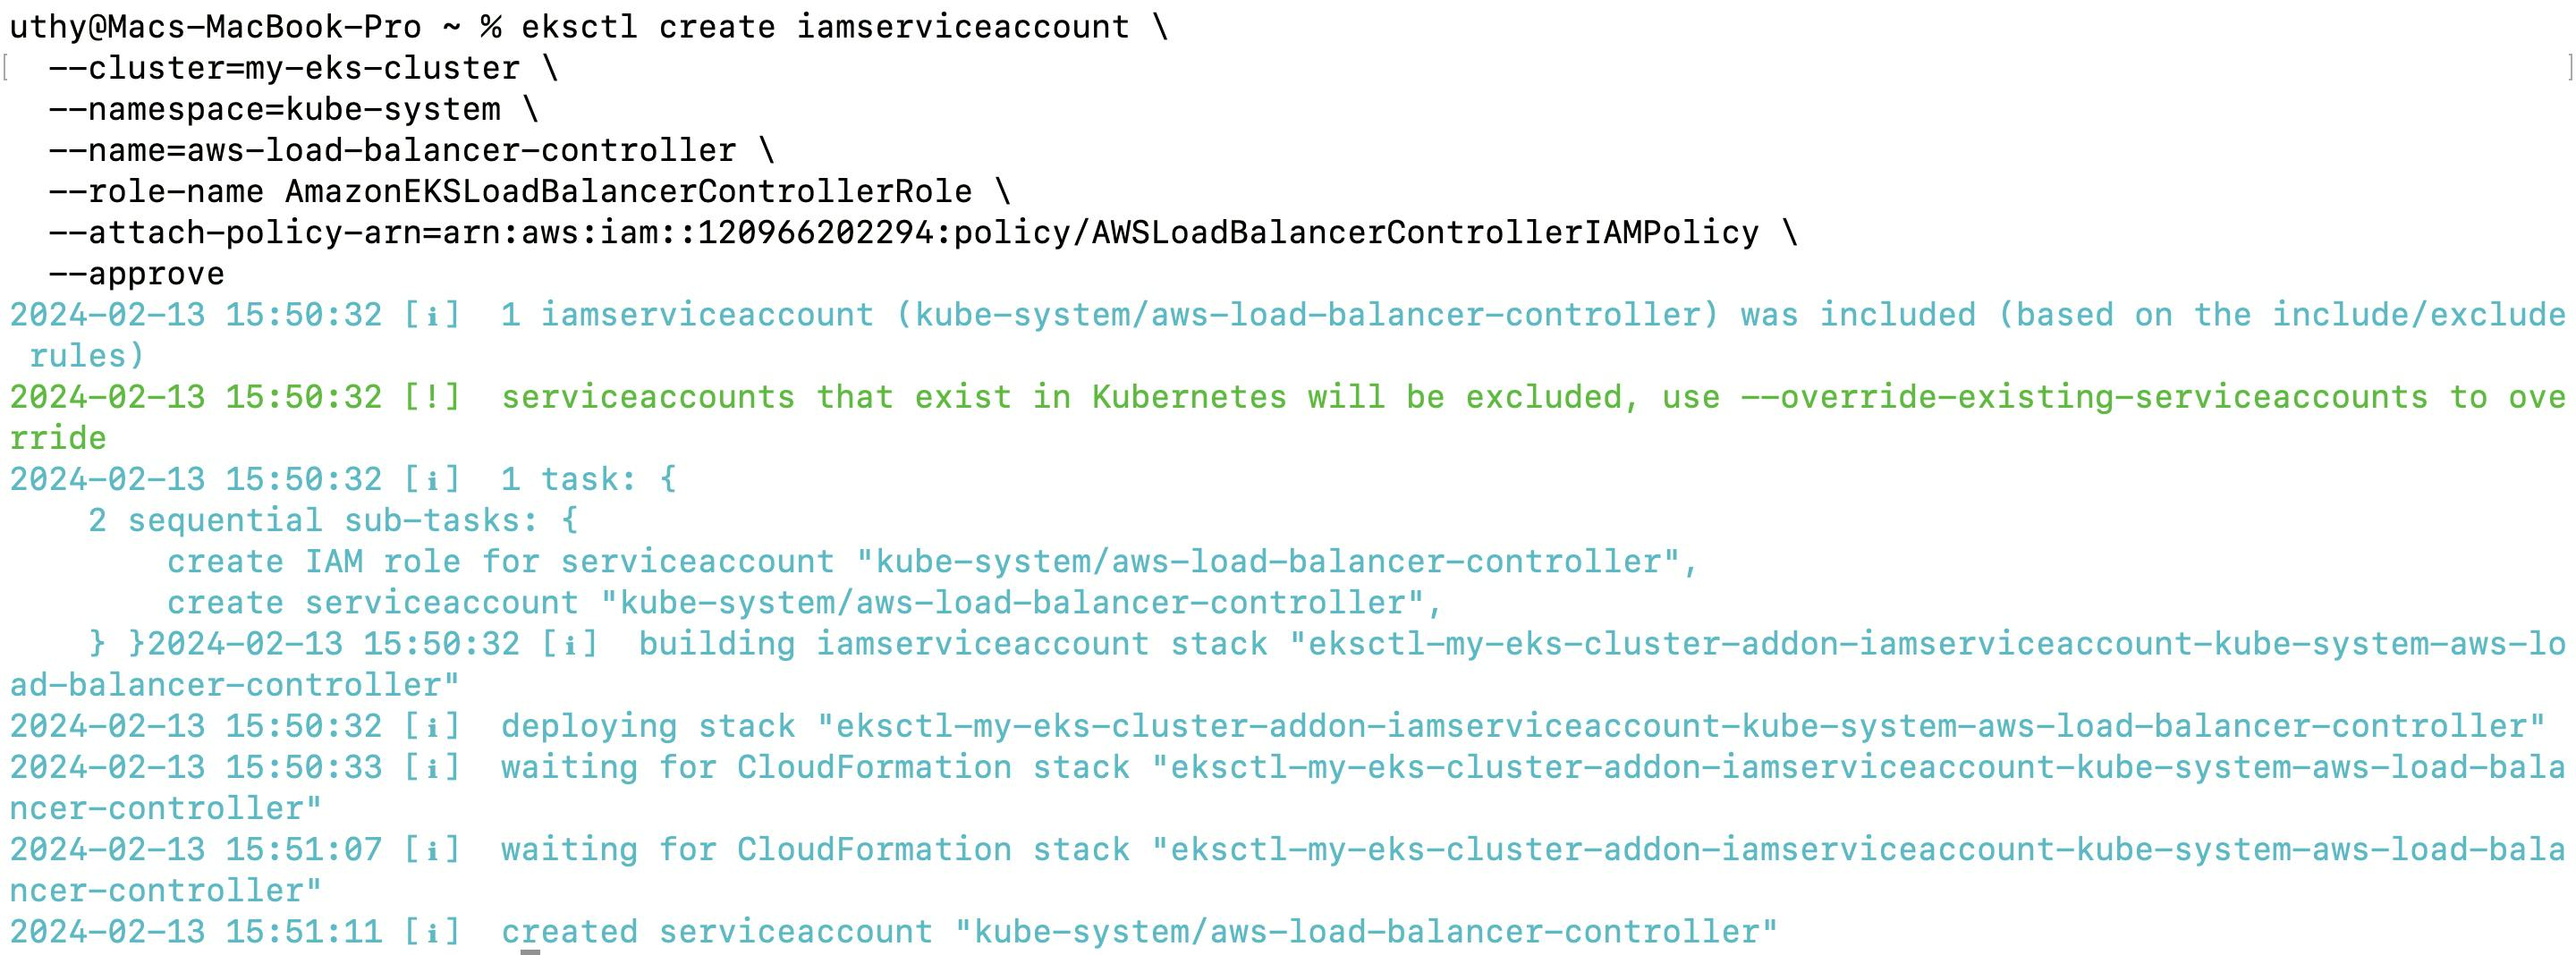
eksctl create iamserviceaccount \
  --cluster=<your-cluster-name> \
  --namespace=kube-system \
  --name=aws-load-balancer-controller \
  --role-name AmazonEKSLoadBalancerControllerRole \
  --attach-policy-arn=arn:aws:iam::<your-aws-account-id>:policy/AWSLoadBalancerControllerIAMPolicy \
  --approve
Remember, you have to modify <your-cluster-name> to your cluster name, then <your-aws-account-id> to your actual AWS account ID.
Since we have your AWS CLI configured
You can easily retrieve your AWS account ID using the AWS CLI.
Here's how:
aws sts get-caller-identity --query "Account" --output text
Running this command will output your AWS account ID.
4. Deploy ALB controller:
Before deploying the ALB controller, ensure that you have Helm installed on your system.
To install Helm, you can follow the instructions provided in the official Helm documentation, which varies depending on your operating system.
For detailed installation guides tailored to your OS, you can refer to the Helm website: Helm Installation Guide.
Once you have Helm installed, you can proceed with deploying the ALB controller by following these steps:"
# Add helm repo
helm repo add eks https://aws.github.io/eks-charts
# Update the repo
helm repo update eks
# Install
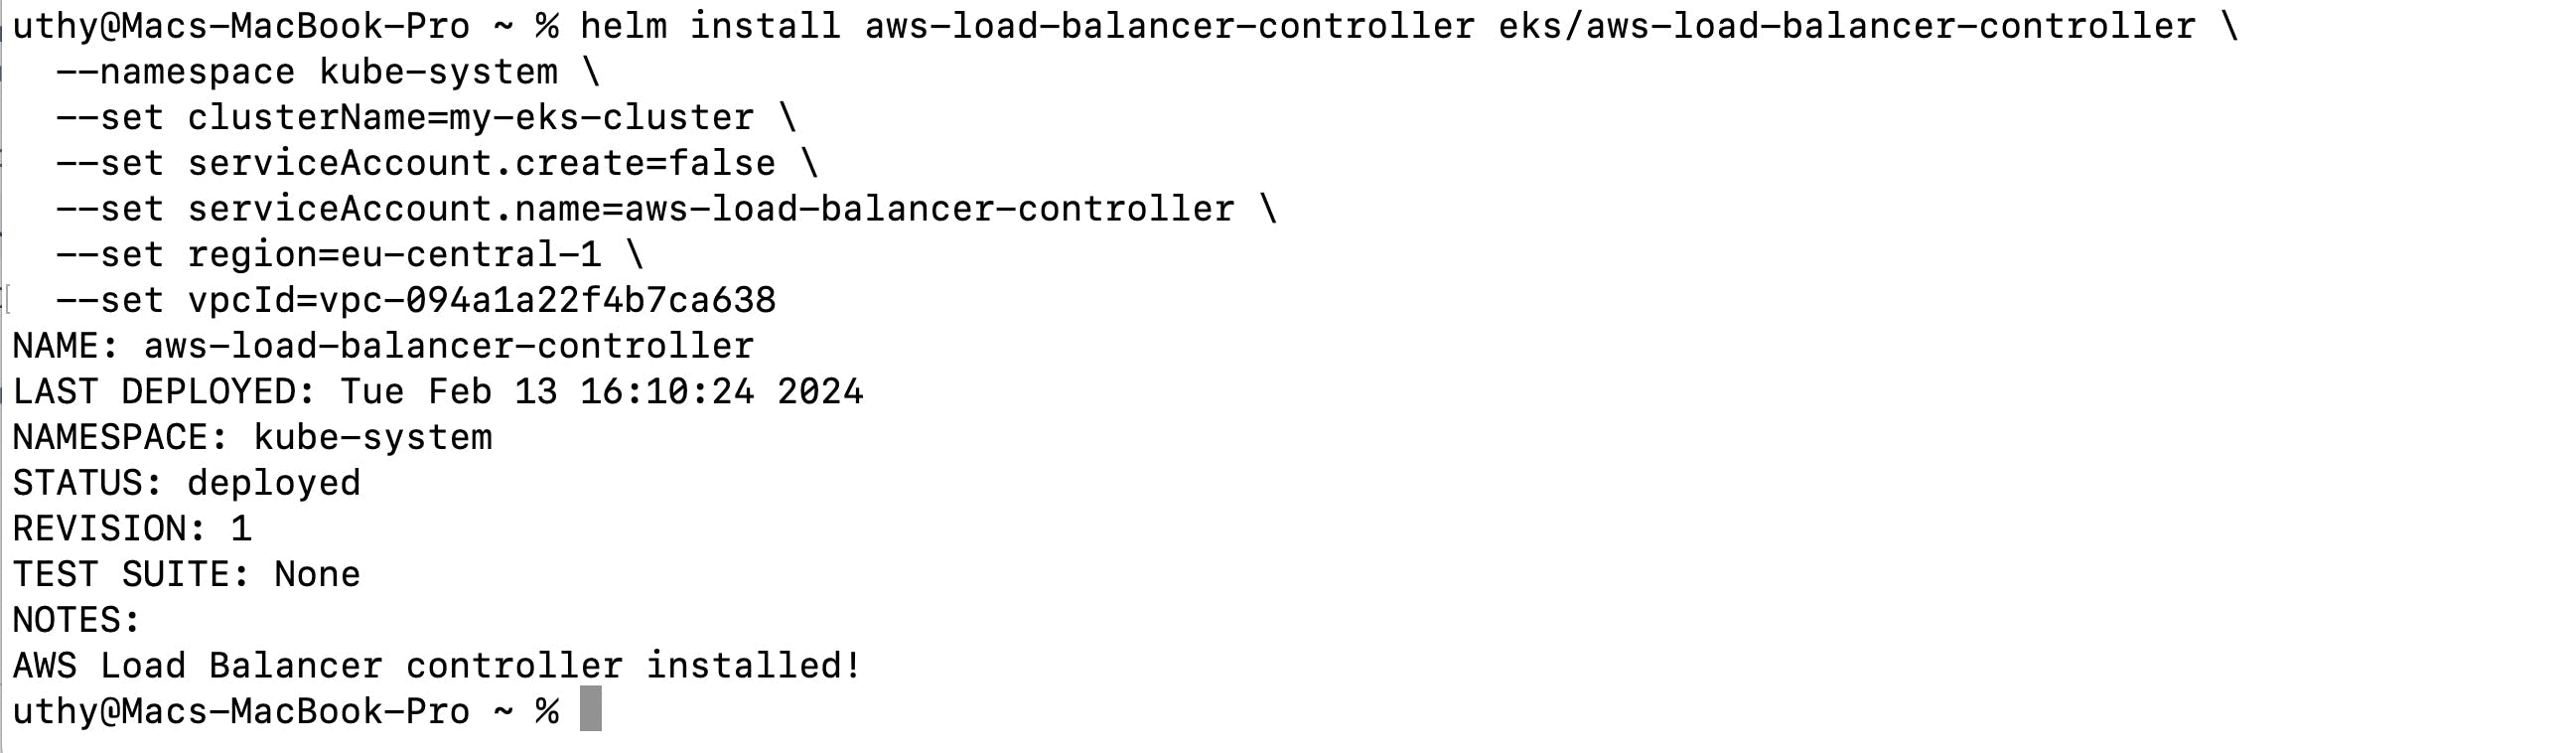
helm install aws-load-balancer-controller eks/aws-load-balancer-controller \
-n kube-system \
--set clusterName=<your-cluster-name> \
--set serviceAccount.create=false \
--set serviceAccount.name=aws-load-balancer-controller \
--set region=<region> \
--set vpcId=<your-vpc-id>
When you run the Helm installation command for the ALB controller, it will deploy the ALB controller to the Kubernetes cluster specified by the --set clusterName=<your-cluster-name> parameter.
We already specified we want it in the kube-system namespace with the -n kube-system parameter and we modify the region also.
You can retrieve the VPC ID associated with your AWS EKS cluster using the AWS CLI.
Here's how:
aws eks describe-cluster --name <your-cluster-name> --query "cluster.resourcesVpcConfig.vpcId" --output text
Replace <your-cluster-name> with the name of your AWS EKS cluster.
After running the helm install command, you should have an output like this
Before deploying applications to our AWS EKS cluster, we've taken two important steps to ensure smooth operation and efficient management:
- IAM OIDC Provider Configuration
We've configured an IAM OIDC provider to establish trust between our Kubernetes cluster and AWS IAM (Identity and Access Management). This allows Kubernetes service accounts to utilize IAM roles for fine-grained access control to AWS resources.
- Deployment of AWS Load Balancer Controller
Additionally, we've deployed the AWS Load Balancer Controller to our Kubernetes cluster.
This controller simplifies the management of AWS Application Load Balancers (ALBs) and Network Load Balancers (NLBs) for our applications running on EKS.
Now, let's proceed with the final step before deploying our applications: configuring the Amazon EBS CSI plugin.
This plugin provides persistent storage capabilities to our applications running on Kubernetes, utilizing Amazon Elastic Block Store (EBS) volumes.
This plugin requires IAM permissions to interact with AWS APIs on your behalf.
1. Create an IAM Role and Attach a Policy
Run the following command to create an IAM role and attach the necessary policy.
Replace <YOUR-CLUSTER-NAME> with the name of your cluster:
eksctl create iamserviceaccount \
    --name ebs-csi-controller-sa \
    --namespace kube-system \
    --cluster <YOUR-CLUSTER-NAME> \
    --role-name AmazonEKS_EBS_CSI_DriverRole \
    --role-only \
    --attach-policy-arn arn:aws:iam::aws:policy/service-role/AmazonEBSCSIDriverPolicy \
    --approve
This command deploys an AWS CloudFormation stack that creates the IAM role and attaches the required IAM policy to it.
2. Enable the EBS CSI Driver
Run the following command to enable the EBS CSI driver as an EKS add-on.
Replace <YOUR-CLUSTER-NAME> with the name of your cluster and <AWS-ACCOUNT-ID> with your AWS account ID:
eksctl create addon --name aws-ebs-csi-driver --cluster <YOUR-CLUSTER-NAME> --service-account-role-arn arn:aws:iam::<AWS-ACCOUNT-ID>:role/AmazonEKS_EBS_CSI_DriverRole --force
This command enables the EBS CSI driver on your EKS cluster using the IAM role created in the previous step.

By following these steps, you'll configure the Amazon EBS CSI plugin and enable it for use with your EKS cluster, allowing your applications to utilize Amazon Elastic Block Store (EBS) volumes for persistent storage.
Deployment of Microservices with Helm
Now that our environment is prepared and Helm is installed, we're ready to deploy our micro-services to the Kubernetes cluster.
We'll utilize Helm charts to streamline the deployment process.
Clone the Repository first.
Clone the repository containing the source code from my GitHub account:
git clone https://github.com/DevOpsGodd/EKS-Three-Tier-Architecture.git
Navigate to the Cloned Repository:
cd EKS-Three-Tier-Architecture
Enter the EKS Directory:
cd EKS
Within the cloned repository, there's a directory named EKS. This command navigates into that directory.
Navigate to the Helm Directory:
cd helm
Inside the EKS directory, there's another directory named helm. This command enters that directory.
This sequence of commands ensures that you're in the correct directory to proceed with deploying the microservices using Helm.
Deploy Microservices
Ensure that you're in the helm directory where the Helm charts are located.
Helm relies on these charts to run the deployments, and it won't work if you're not in the correct directory.
Now, run the following command to create a namespace for the robot-shop microservices:
kubectl create ns robot-shop
After creating the namespace, you can proceed to deploy the microservices using Helm:
helm install robot-shop --namespace robot-shop .
This command installs the robot-shop microservices into the robot-shop namespace.
you should get this after deployment
Checking Pods: After deploying the microservices, you can verify that they are running by running the kubectl get pods -n robot-shop command.
This command lists all the pods in the robot-shop namespace, where your microservices are deployed.
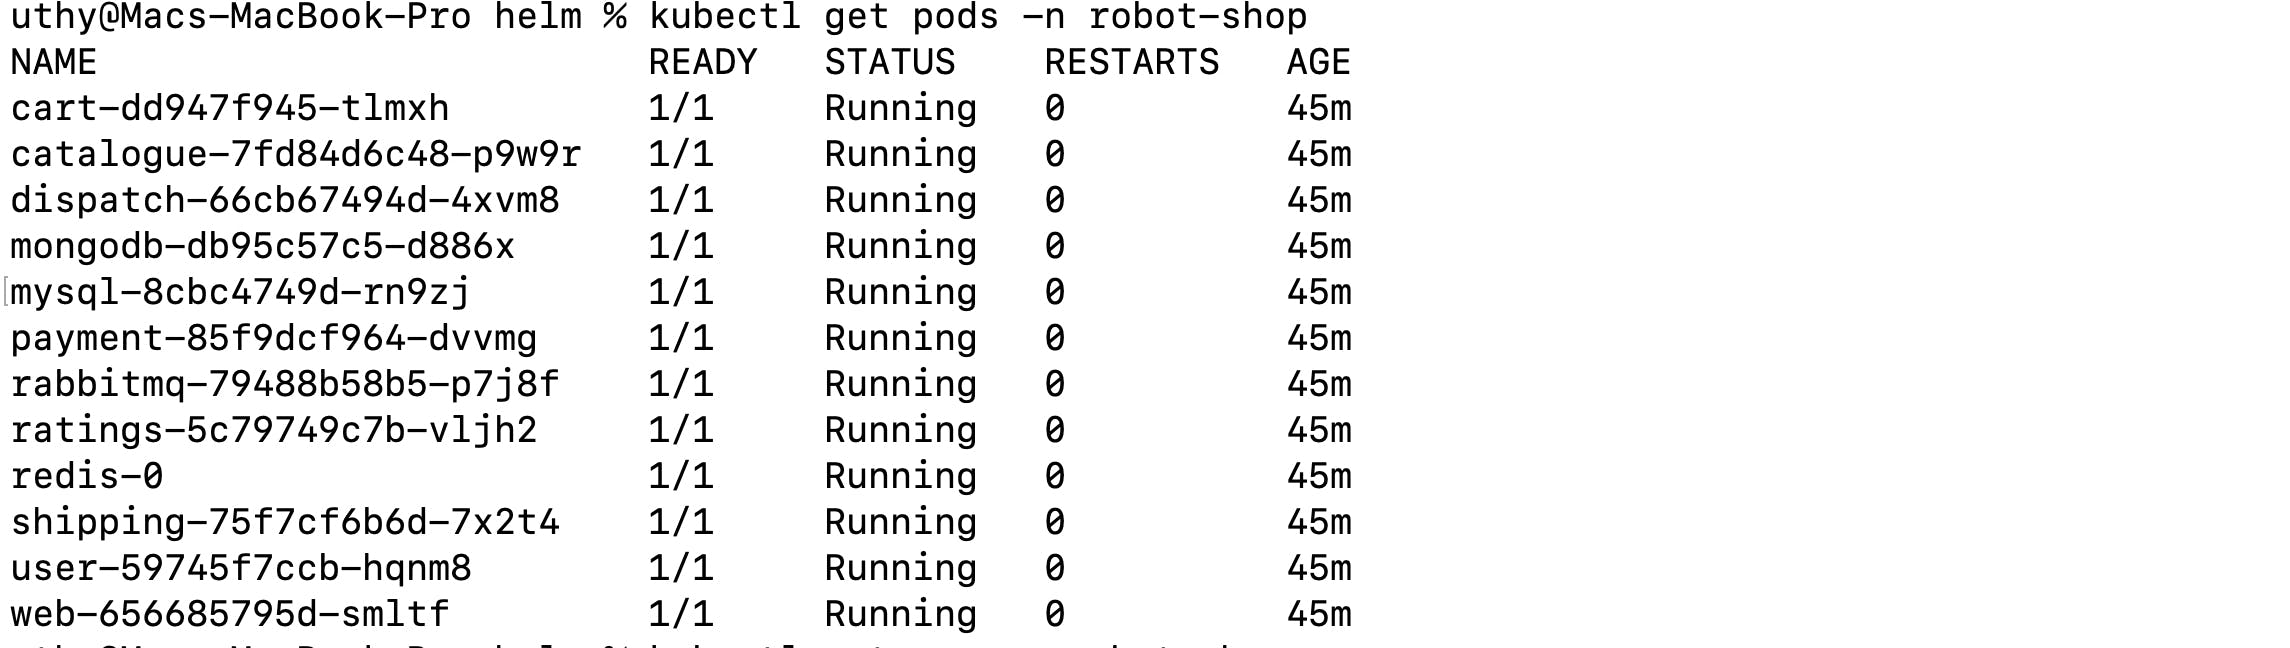
As you can see above, each of the microservices are running in the pods.
The -n robot-shop argument there is just us specifying the namespace we are interested in getting resources from.
Checking Services: You can also check the services running in the robot-shop namespace by running the kubectl get svc -n robot-shop command.
This command lists all the services in the robot-shop namespace.

The last service listed should be a load balancer service.
However, you won't be accessing your cluster directly using this load balancer.
Using Ingress for Access: Instead of accessing your cluster directly through the load balancer, you'll use an Ingress resource.
The Ingress resource is defined in an ingress.yaml file located within the Helm directory in the repository you cloned.
apiVersion: networking.k8s.io/v1
kind: Ingress
metadata:
  namespace: robot-shop
  name: robot-shop
  annotations:
    kubernetes.io/ingress.class: alb
    alb.ingress.kubernetes.io/scheme: internet-facing
    alb.ingress.kubernetes.io/target-type: ip
spec:
  rules:
    - http:
        paths:
          - path: /
            pathType: Prefix
            backend:
              service:
                name: web
                port:
                  number: 8080
This Ingress resource defines rules for routing incoming traffic to your microservices.
Here's a breakdown of the Ingress resource:
Annotations: These annotations specify that the Ingress should use AWS ALB (Application Load Balancer) as the ingress controller, and it should be internet-facing.
Rules: These rules define how incoming HTTP traffic should be routed to your microservices. In this case, all incoming traffic (
/) is routed to thewebservice running on port 8080.
Applying the Ingress: To deploy the Ingress resource, you simply apply the ingress.yaml file using the kubectl apply -f ingress.yaml command.
kubectl apply -f ingress.yaml
This command applies the configuration defined in the Ingress resource to your Kubernetes cluster.
Verifying Ingress Deployment: After applying the Ingress resource, you can verify that it's deployed correctly by running the kubectl get ingress command.
kubectl get ingress -n robot-shop
This command lists all the Ingress resources in your cluster.
You should see our robotshop Ingress listed.

You might notice that when I ran the command the first time, I didn't specify the namespace, so it automatically checked the default namespace and told me no resources were found.
It's important to note that Kubernetes commands like kubectl get ingress without specifying a namespace will only list resources in the default namespace.
If your resources are deployed in a different namespace, you must explicitly specify it with the -n or --namespace flag to view them.
After deploying the Ingress resource, you can visit the URL address generated by the Ingress controller to access your application.
This URL will route incoming traffic to the appropriate microservices based on the rules defined in the Ingress resource.

Cleanup
After completing your work with Amazon EKS, it's crucial to clean up any resources to avoid incurring unnecessary costs.
Follow these steps to delete your EKS cluster and associated resources:
Delete IAM OIDC Provider:
If you created an IAM OIDC provider for the cluster, you can delete it using the AWS CLI:
eksctl delete iamserviceaccount --cluster <cluster-name> --name aws-load-balancer-controller --namespace kube-systemThis command removes the IAM role and service account associated with the AWS Load Balancer Controller.
Delete IAM Policy for ALB Controller:
If you created a custom IAM policy for the ALB Controller, delete it using the AWS CLI:
aws iam delete-policy --policy-arn arn:aws:iam::<your-aws-account-id>:policy/AWSLoadBalancerControllerIAMPolicyReplace
<your-aws-account-id>with your AWS account ID.Delete the EKS Cluster:
Use eksctl to delete the EKS cluster. Replace
<cluster-name>with the name of your cluster:eksctl delete cluster --name <cluster-name>This command will delete the EKS cluster along with its associated resources.
By following these cleanup procedures, you can ensure that your AWS resources are efficiently managed, reducing unnecessary costs and maintaining a tidy environment.
Additional Resources:
Project Github Repository: Access the source code and resources used in this project on the GitHub repository: EKS-Three-Tier-Architecture
Watch This Done Realtime on YouTube: For a visual walkthrough of the steps involved in deploying microservices to an EKS cluster, watch Abhishek demonstration on YouTube.
AWS Documentation: Explore the comprehensive AWS documentation for detailed information on managing Amazon EKS clusters and associated resources. The documentation provides in-depth guides, tutorials, and best practices: Amazon EKS Documentation